Developer Guide
- Acknowledgements
- Setting up, getting started
- Design
- Implementation
- Documentation, logging, testing, configuration, dev-ops
-
Appendix: Requirements
- Product scope
- User stories
-
Use cases
- Use case: Add a case
- Use case: Edit a case
- Use case: Delete a single case by index
- Use case: Delete multiple cases by index
- Use case: Delete multiple cases by date
- Use case: Delete multiple cases by date range
- Use case: Find cases by name
- Use case: Find cases by age range
- Use case: Find cases by name, age and date range
- Use case: Sort the case list
- Use case: Undo an action
- Use case: Change the overview type
- Use case: Import data
- Use case: Export/checkout data
- Non-Functional Requirements
- Glossary
- Appendix: Instructions for manual testing
- Appendix: Effort
- Appendix: Planned Enhancements
Acknowledgements
- Libraries used: JavaFX, Jackson, JUnit5, OpenCSV
- Adapted from: AddressBook Level 3, ay2223s1-f09-2
Setting up, getting started
Refer to the guide Setting up and getting started.
Design
![]() Tip: The
Tip: The .puml files used to create diagrams in this document can be found in the diagrams folder. Refer to the PlantUML Tutorial at se-edu/guides to learn how to create and edit diagrams.
Architecture
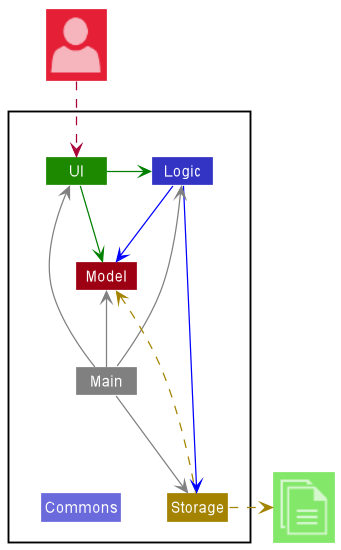
The Architecture Diagram given above explains the high-level design of the App.
Given below is a quick overview of main components and how they interact with each other.
Main components of the architecture
Main has two classes called Main and MainApp. It is responsible for
- At app launch: Initialising the components in the correct sequence, and connecting them up with each other.
- At shut down: Shutting down the components and invoking cleanup methods where necessary.
Commons represents a collection of classes used by multiple other components.
The rest of the App consists of four components:
-
UI: The UI of the App. -
Logic: The command executor. -
Model: Holds the data of the App in memory. -
Storage: Reads data from, and writes data to various platforms of storage.
How the architecture components interact with each other
The Sequence Diagram below shows how the components interact with each other for the scenario where the user issues the command delete 1.
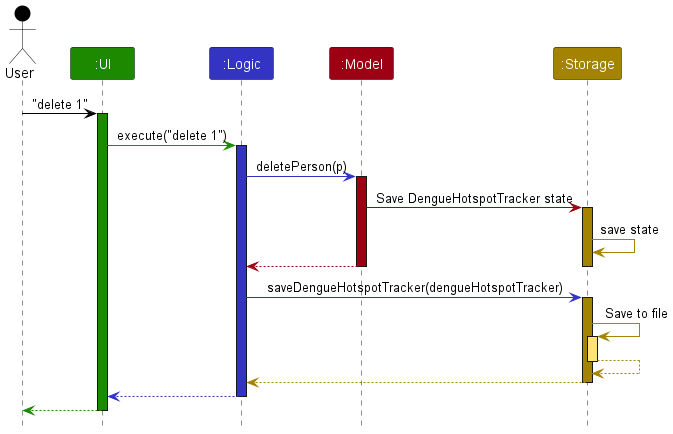
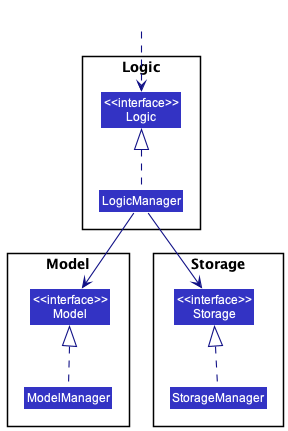
Each of the four main components (also shown in the diagram above),
- defines its API in an
interfacewith the same name as the Component. - implements its functionality using a concrete
{Component Name}Managerclass (which follows the corresponding APIinterfacementioned in the previous point.
For example, the Logic component defines its API in the Logic.java interface and implements its functionality using the LogicManager.java class which follows the Logic interface. Other components interact with a given component through its interface rather than the concrete class (reason: to prevent outside component’s being coupled to the implementation of a component), as illustrated in the (partial) class diagram below.
The sections below give more details of each component.
UI component
The API of this component is specified in Ui.java
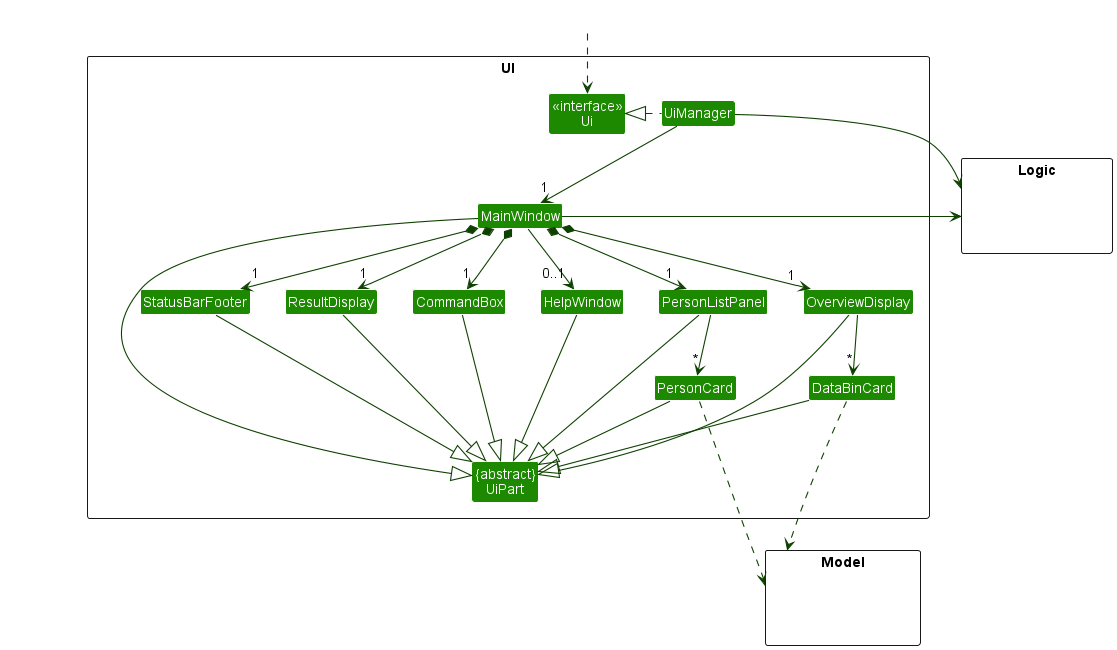
The UI consists of a MainWindow that is made up of parts e.g.CommandBox, ResultDisplay, PersonListPanel, StatusBarFooter etc. All these, including the MainWindow, inherit from the abstract UiPart class which captures the commonalities between classes that represent parts of the visible GUI.
The UI component uses the JavaFx UI framework. The layout of these UI parts are defined in matching .fxml files that are in the src/main/resources/view folder. For example, the layout of the MainWindow is specified in MainWindow.fxml.
The UI component
- executes user commands using the
Logiccomponent. - listens for changes to
Modeldata so that the UI can be updated with the modified data. - keeps a reference to the
Logiccomponent, because theUIrelies on theLogicto execute commands. - depends on some classes in the
Modelcomponent, as it displaysPersonobjects residing in theModel.
Logic component
API : Logic.java
Here is a (partial) class diagram of the Logic component:
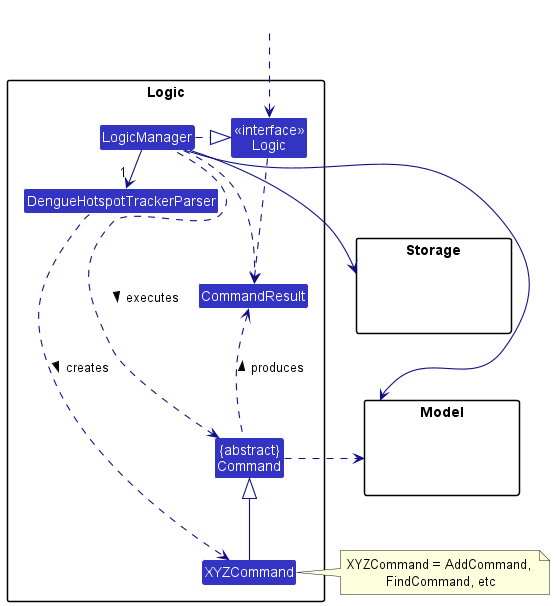
How the Logic component works:
- When
Logicis called upon to execute a command, it uses theDengueHotspotTrackerParserclass to parse the user command. - This results in a
Commandobject (more precisely, an object of one of its subclasses e.g.AddCommand) which is executed by theLogicManager. - The command can communicate with the
Modelwhen it is executed (e.g. to add a case). - The result of the command execution is encapsulated as a
CommandResultobject which is returned back fromLogic.
The Sequence Diagram below illustrates the interactions within the Logic component for the execute("delete 1") API call.

Here are the other classes in Logic (omitted from the class diagram above) that are used for parsing a user command:
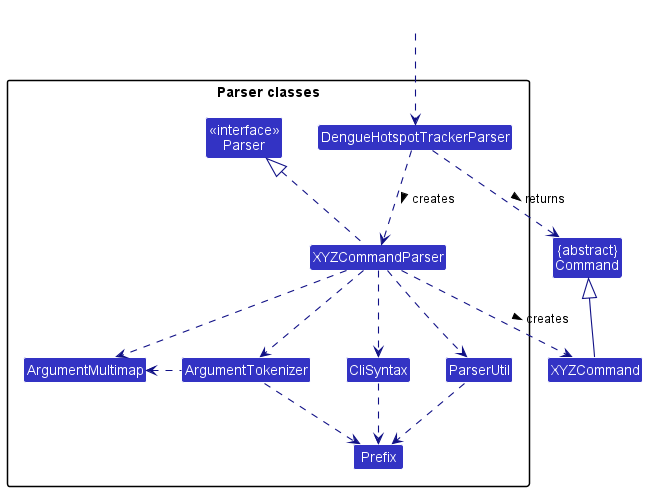
How the parsing works:
- When called upon to parse a user command, the
DengueHotspotTrackerParserclass will do one of the following:- create an
XYZCommandParser(XYZis a placeholder for the specific command name e.g.AddCommandParser) which uses the other classes shown above to parse the user command and create aXYZCommandobject (e.g.AddCommand) that theDengueHotspotTrackerParserreturns back as aCommandobject. - create an
XYZCommand.
- create an
- All
XYZCommandParserclasses (e.g.AddCommandParser,DeleteCommandParser) inherit from theParserinterface so that they can be treated similarly where possible e.g. during testing. - Similarly, all
XYZCommandclasses inherit from theCommandabstract class and are executable.
Model component
API : Model.java
Here is a (partial) class diagram of the Model component:
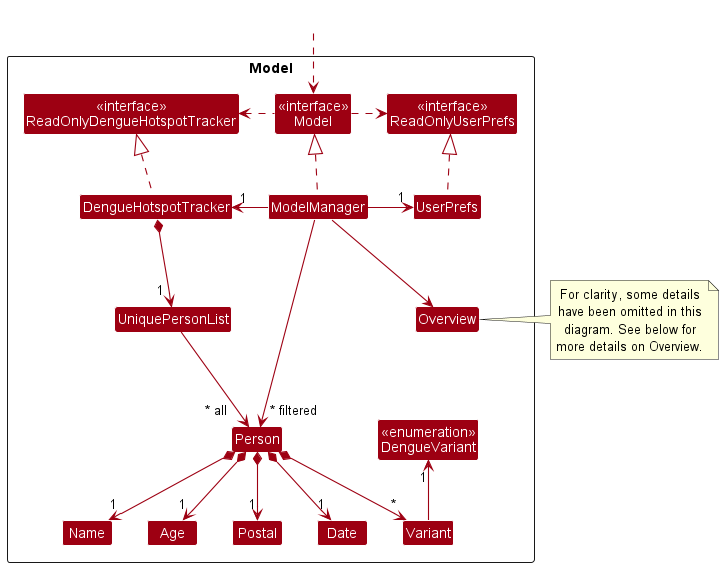
The Model component
- stores the Dengue Hotspot Tracker data, i.e. all
Personobjects (which are contained in aUniquePersonListobject). - stores the currently ‘selected’
Personobjects (e.g. results of a search query) as a separate filtered list which is exposed to outsiders as an unmodifiableObservableList<Person>that can be ‘observed’ e.g. the UI can be bound to this list so that the UI automatically updates when the data in the list change. - stores an
Overviewobject that manages the histogram-like data of the currentUniquePersonList. It is updated whenever theModelis updated with a command execution. - stores a
UserPrefobject that represents the user’s preferences. This is exposed to the outside as aReadOnlyUserPrefobjects. - does not depend on any of the other three components (as the
Modelrepresents data entities of the domain, they should make sense on their own without depending on other components).
![]() Note:
Note:
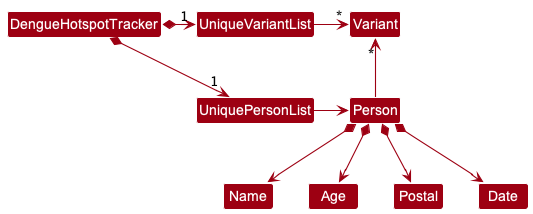
An alternative (arguably, a more OOP) model is given below. It has a Variant list in the DengueHotspotTracker, which Person references. This allows DengueHotspotTracker to only require one Variant object per unique dengue variant, instead of each Person needing their own Variant objects.
Here are some more details on how Overview is designed:
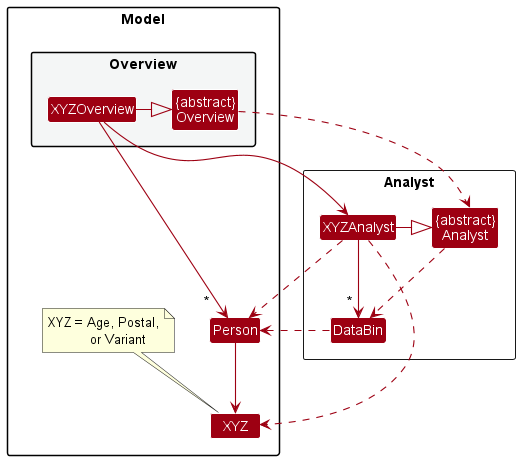
How the Overview component works:
- There are 3 implementations of
Overview:AgeOverview,PostalOverviewandVariantOverview. Only one is active in aModelat a time. - Each of these implementations has a respective
Analystclass, which sortsPersonobjects into groups and counts the number in each.- The way a
Personis sorted depends on the type ofAnalystemployed. - e.g. for
AgeAnalyst,Personinstances who fall in the same age group will be placed in the same bin.
- The way a
- This sorting and counting is aided with the use of simple
DataBinobjects, which store only a count and a group name.
Overall, we have this flow:
- An
XYZOverviewis instantiated or updated with a list ofPersonobjects. - Doing so will create a new
XYZAnalystobject with the givenPersonlist as the input. - Upon instantiation of
XYZAnalyst, the input list is sorted intoDataBinobjects. - The summary of the data can then be obtained.
Storage component
API : Storage.java
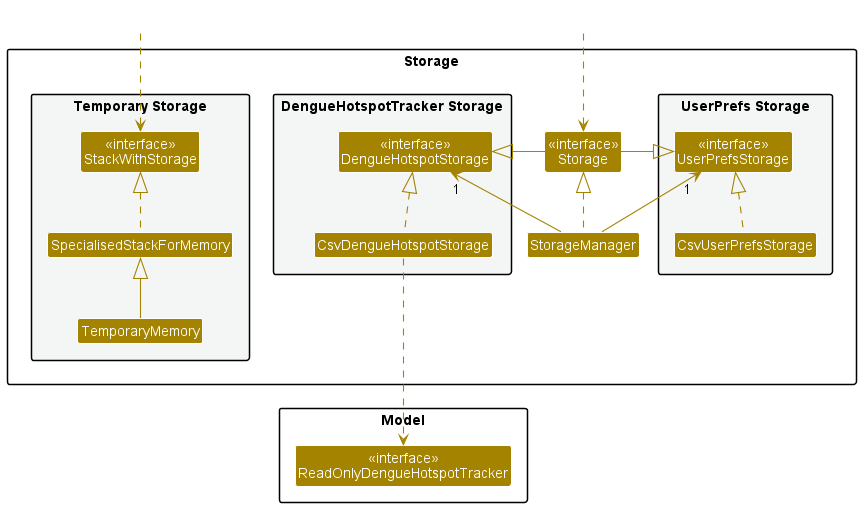
The Storage component can be divided into two main components, one for temporary storage, and one for permanent storage of the file.
The permanent storage component:
- can save both Dengue Hotspot Tracker data and user preference data in csv format, and read them back into corresponding objects.
- inherits from both
DengueHotspotStorageandUserPrefStorage, which means it can be treated as either one (if only the functionality of one is needed). - depends on some classes in the
Modelcomponent (because theStoragecomponent’s job is to save/retrieve objects that belong to theModel).
The temporary component temporarily saves DengueHotspotTracker data while the app is running to support undo and redo commands. To prevent taking up too much memory,
only up to 10 states of the DengueHotspotTracker are stored. This component supports:
- undoing and redoing up to a maximum of 10 steps.
- multiple undo and redo operations at once.
Once a user makes a change to the state of the DengueHotspotTracker after an undo operation is called, redos will no longer be possible, and all other “future” states of the DengueHotspotTracker
will be cleared.
Common classes
Classes used by multiple components are in the seedu.dengue.commons package.
Implementation
This section describes some noteworthy details on how certain features are implemented.
Add feature
Implementation
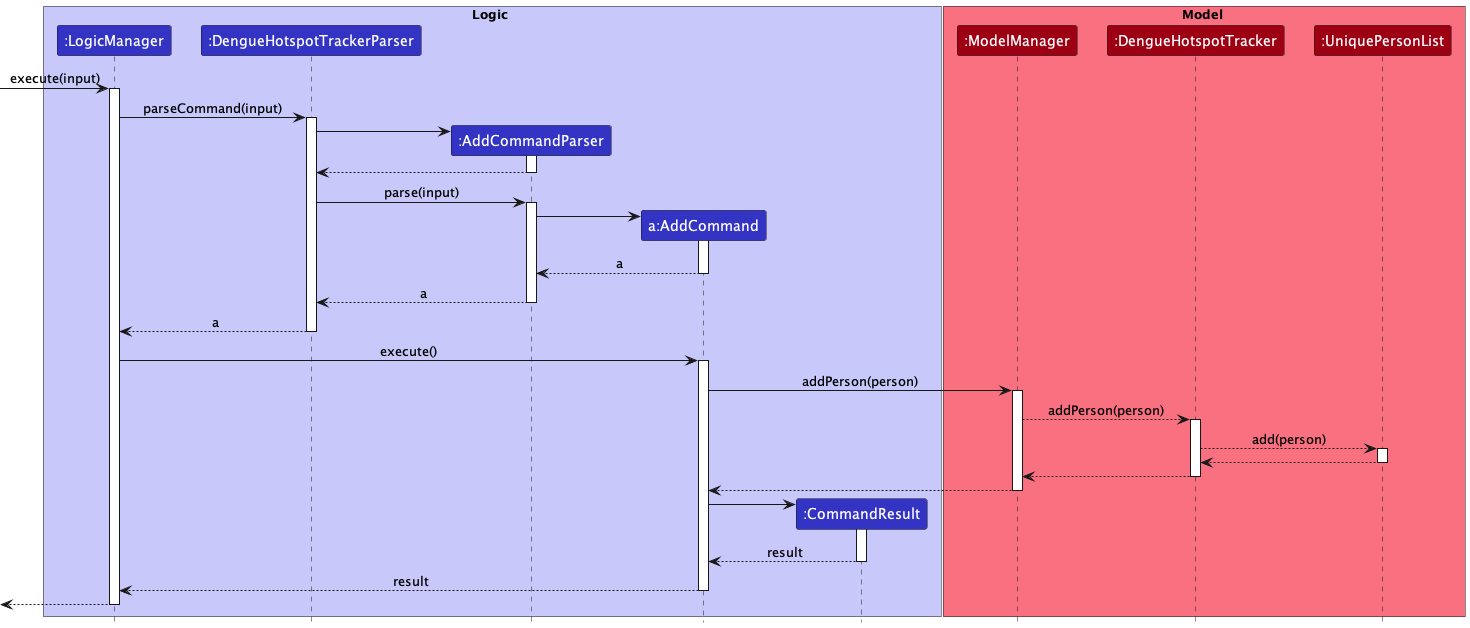
The add feature is accessed through the addPerson operation that allows users to add a new case to the Person class of the application.
The Person added by the user has four compulsory fields and one optional field.
-
Nameof the person -
Dateof the case -
Postalcode of the case -
Ageof the person -
Variantof the case (optional)
The addPerson operation is facilitated by AddCommand which extends from Command.
Step 1. DengueHotspotTracker#parseCommand() checks that the user input matches that the COMMAND_WORD of AddCommand
Step 2. AddPersonParse#parse() will process the additional inputs and return an AddCommand.
Step 3. AddCommand is executed and AddCommand#execute() triggers the Model interface’s Model#addCommand().
Step 4. DengueHotspotTracker#addPerson will add a person to a uniquePersonList via the uniquePersonList#add() command.
Step 5. Additionally StorageManager#saveDengueHotspotTracker() is called every time after a command to save the event to data/denguehotspottracker.csv.
The following sequence diagram will illustrate how addPerson operation works:
Edit feature
Implementation
The implementation for the edit command is largely similar to that of the add command.
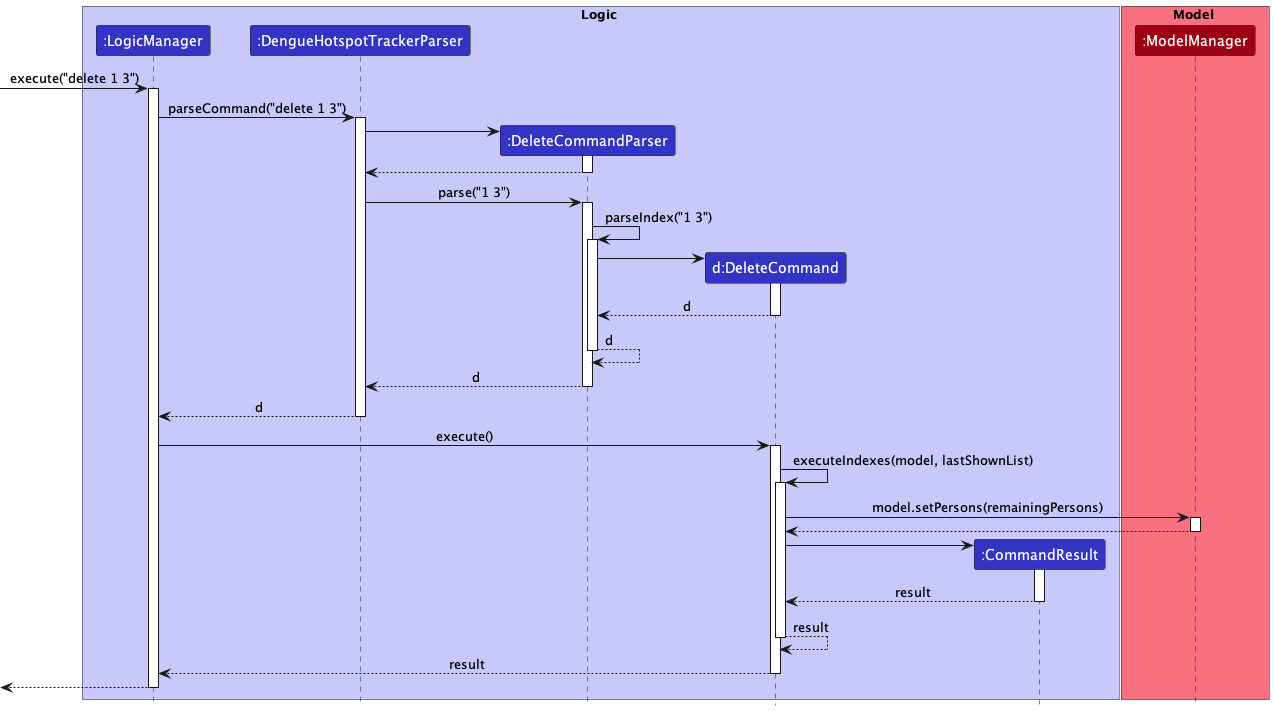
Multi-index delete feature
Implementation
The multi-index delete mechanism is primarily facilitated by the DengueHotspotTrackerParser#parseCommand(), DeleteCommandParser#parse(), and DeleteCommand#execute() methods.
Given below is an example usage scenario and how the multi-index delete mechanism behaves at each step.
Step 1. The user launches the application and uses the find command to filter the list of cases. The ModelManager’s FilteredList<Person> is updated.
Step 2. The user executes the delete 1 3 command to delete the first and third cases in the filtered list currently being shown. DengueHotspotTrackerParser#parseCommand() parses the command and, detecting the delete command word, passes the argument 1 3 to the DeleteCommandParser.
Step 3. DeleteCommandParser#parse() is called. A list of valid indexes List<Index> is returned, and a DeleteCommand is constructed, taking in this list of indexes as an argument.
Step 4. DeleteCommand#execute() will get the most updated list of filtered cases and delete the cases associated with each given index. Users will be notified with a message upon successful deletion of all relevant cases.
The following sequence diagram shows how the multi-index delete operation works:
The following activity diagram summarises what happens when a user executes a multi-index delete command:

Design Considerations
Aspect: How multi-index delete indicates successful execution
-
Alternative 1 (current choice): Display a message indicating that a number of cases were successfully deleted, the number of cases corresponding to the size of the list of indexes.
- Pros: Short and succinct, without taking up too much space on the GUI.
- Cons: Does not show exactly which cases were deleted.
-
Alternative 2: Display a message indicating successful deletion for each individual deleted case, along with the details of the deleted case.
- Pros: Shows exactly which cases were deleted for easy validation.
- Cons: Unnecessarily lengthy; may take up too much space if many cases were deleted at once.
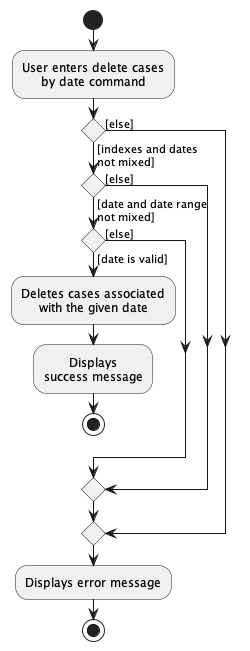
Delete-by-date feature
Implementation
The delete-by-date mechanism is primarily facilitated by the DengueHotspotTrackerParser#parseCommand(), DeleteCommandParser#parse(), and DeleteCommand#execute() methods.
Given below is an example usage scenario and how the delete-by-date mechanism behaves at each step.
Step 1. The user launches the application and uses the find command to filter the list of cases. The ModelManager’s FilteredList<Person> is updated.
Step 2. The user executes the delete d/2023-03-30 command to delete all cases from 30th March 2023 in the filtered list currently being shown. DengueHotspotTrackerParser#parseCommand() parses the command and, detecting the delete command word, passes the argument d/2023-03-30 to the DeleteCommandParser.
Step 3. DeleteCommandParser#parse() is called. The date 2023-03-30 is extracted, and a DeleteCommand is constructed, taking in this date as a Date object argument.
Step 4. DeleteCommand#execute() will get the most updated list of filtered cases and delete the cases from the given date. Users will be notified with a message upon successful deletion of all relevant cases stating the number of cases deleted and the date the cases were from.
To see how the delete-by-date mechanism works, as well as to understand the design considerations taken, you may refer to the multi-index delete feature’s sequence diagram, as they work largely similarly besides the parsing of dates and the use of the executeDate method instead.
The following activity diagram summarises what happens when a user executes a delete-by-date command:
Design Considerations
Aspect: What attributes the delete command can delete by
-
Alternative 1 (current choice): Allow users to
deleteonly by date.- Pros: Provides a convenient shortcut for the most probable use case out of all batch-delete use cases, rather than clogging up the app with features that will likely go unused.
- Cons: The user may be confused at the difference in affordances between
deleteand the other commands that similarly allow for prefixes to target a particular attribute, such aseditandfind.
-
Alternative 2: Allow users to
deleteby all attributes, e.g. delete by name, age, postal, etc., similar to theeditandfindcommands.- Pros:
deletecommand would better match the functionality allowed by the other commands that similarly allow for prefixes to target a particular attribute, such aseditandfind. - Cons: Deleting by name, age, etc. are use cases that are much rarer than deleting by date.
If necessary, they can be accomplished by
finding by the relevant attribute beforeclearing. Allowing deletion by date provides a handy shortcut for the most probable use case, keeping the app free of less important features.
- Pros:
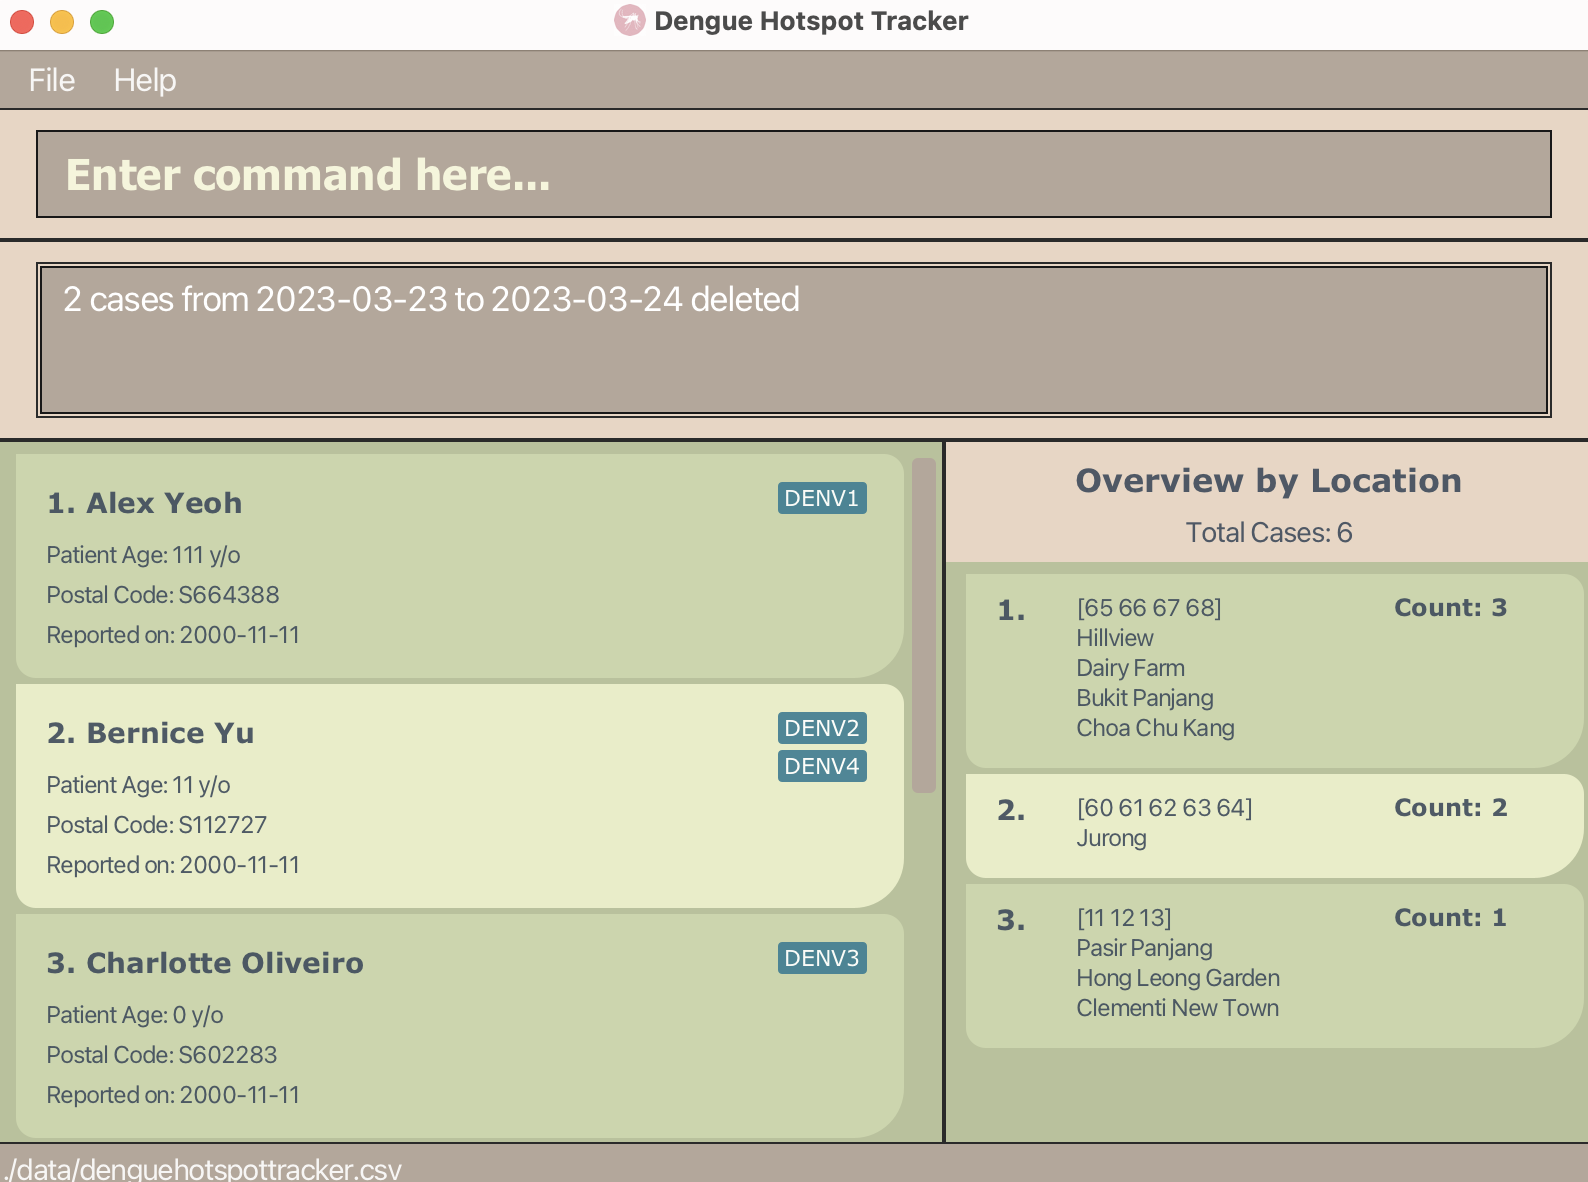
Delete-by-date-range feature
Implementation
This feature is largely similar to the delete-by-date feature, except that the user can input up to two dates,
a start date sd/ and an end date ed/. For instance, delete sd/2023-03-23 ed/2023-03-25 will
delete all cases from 23rd March 2023 to 25th March 2023 inclusively.
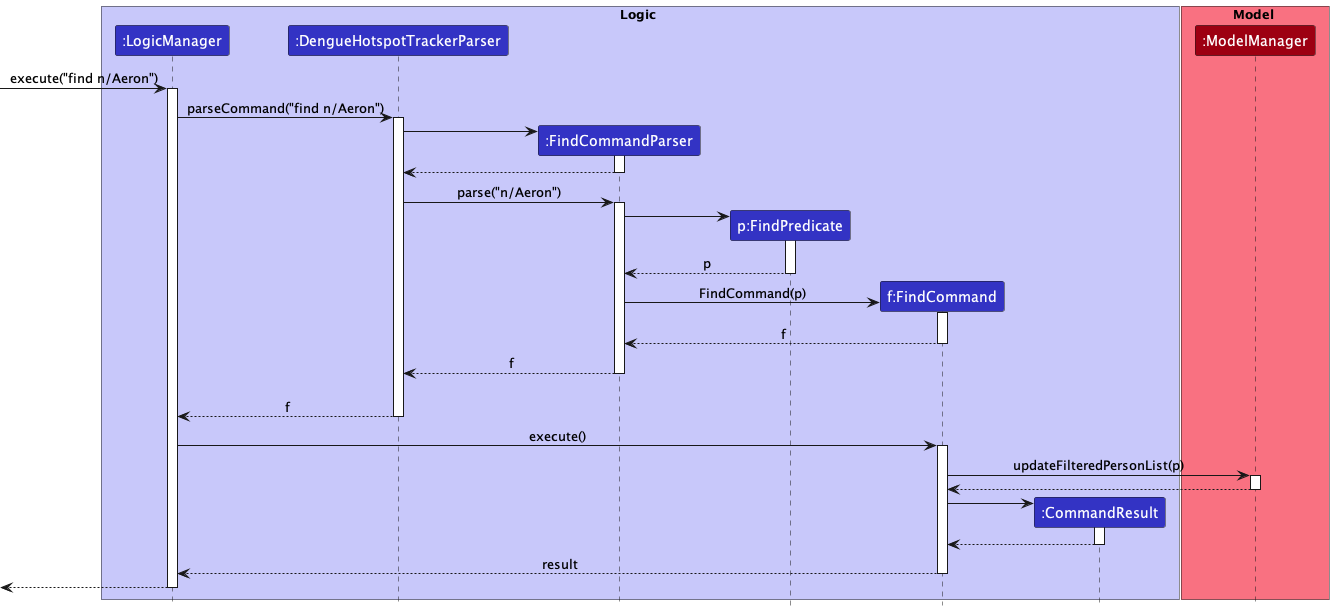
Find-by-prefix feature
Implementation
The proposed find-by-prefix feature mechanism is primarily facilitated by the DengueHotspotTrackerParser#parseCommand(),
FindCommandParser#parse(), FindPredicate#test(), and FindCommand#execute()methods.
Given below is an example usage scenario and how the find-by-prefix mechanism behaves at each step.
Step 1. The user launches the application.
Step 2. The user executes the find a/ 13 n/ Thomas p/ 612 command to filter the list of cases which contain a dengue
case associated with the name Thomas, who is of the age 13 and has a postal code beginning with 612.
Step 3. DengueHotspotTrackerParser#parseCommand() parses the command and, detecting the find command word,
passes the argument a/ 13 n/ Thomas p/ 612 to the FindCommandParser.
Step 4. FindCommandParser#parse() is called. The Age 13, Name Thomas and SubPostal (a substring of a
postal) 612 are validated then extracted, and a FindPredicate is constructed which is the predicate used to test
whether the person in the Dengue Case List matches all the given arguments.
Step 5. FindPredicate is passed back into FindCommandParser#parse() and a new FindCommand is constructed, taking
in this FindPredicate.
Step 6. FindCommand#execute() will get the most updated list of filtered cases based on the FindPredicate#test()
and displays it on the User Interface along with a success message.
The following sequence diagram summarises what happens when a user executes a find-by-prefix operation:
Design Considerations
Aspect: How find-by-prefix handles inputs that do not make sense (e.g. numerics in names, non-existent postal codes)
-
Alternative 1: Accepts the user input and executes the find command as per usual.
- Pros: Allows for user freedom in cases that there may be people with numerics in names, and the underlying code would not have to change if new postal codes were to be implemented.
- Cons: In the case of the input being erroneous, there is no indication for the user that it may be due to what they keyed in.
-
Alternative 2 (current choice): Displays a message indicating that the input is erroneous for the first erroneous
prefix detected.
- Pros: In the case of the input being erroneous, there would be an indication for the user that their input may be unintended.
- Cons: Less flexibility and requires changes to the code base if new postal codes are added.
Find-by-range feature
Implementation
This feature is largely similar to the find-by-prefix feature, except that the user can input up to two dates and up to
two ages, a start date sd/ and an end date ed/ instead of a specific date d/, or a start age sa/ and an end age
ea/ instead of a specific age a/. For instance, find sd/2023-03-23 ed/2023-03-25 will find all cases from that
occurred from 23rd March 2023 to 25th March 2023 inclusively.
The following activity diagram summarises what happens when a user enters a find-by-range command.
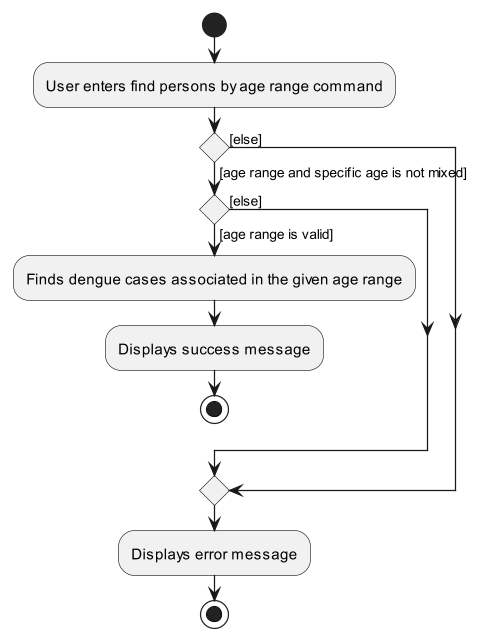
Design Considerations
Aspect: How find-by-range handles invalid ranges (start of a range is after the end of a range)
-
Alternative 1: Accepts the user input and executes the find command as per usual, showing success message of zero
cases found.
- Pros: It is a straightforward approach that requires minimal development effort.
- Cons: It may confuse users who are not familiar with the range syntax and are unaware that their input is invalid and will always show zero cases found.
-
Alternative 2 (current choice): Displays a message indicating that the input range is erroneous.
- Pros: In the case of the user unknowingly making an erroneous input, there would be an indication to the user that their input may be unintended.
- Cons: It is no longer as straightforward in development due to requiring validation checkers for the separate date ranges and age ranges.
Aspect: How find-by-range handles only one of the range prefix of the two are present
-
Alternative 1 (current choice): Accepts the user input and executes the find command, finding all cases that
matches after the start of a range if only the start range prefixes are used, or any cases that matches before the end
of a range if only the end range prefixes are used.
- Pros: It provides more functionality and convenience to the user if they only want to find cases that matches after a certain start of a range, or before a certain end of a range.
- Cons: It may confuse users who are not familiar with the range syntax as it is more difficult to understand that the prefixes could be either used simultaneously or individually.
-
Alternative 2: The range prefixes must come in a pair, displaying a message indicating that the user input is
erroneous otherwise.
- Pros: It requires minimal development effort, and it is less confusing to the user as fixing range as a pair is a simple-to-understand implementation.
- Cons: The range prefixes are less flexible, and less convenient if the user only wants to find cases that matches after a certain start of a range, or before a certain end of a range.
Sort feature
Implementation
The sort mechanism is primarily facilitated by the DengueHotspotTrackerParser#parseCommand(), SortCommandParser#parse(), and SortCommand#execute() methods.
Given below is an example usage scenario and how the sort mechanism behaves at each step.
Step 1. The user launches the application and executes the sort n/ command to sort the list by name.
Step 2. DengueHotspotTrackerParser#parseCommand() parses the command and, detecting the sort command word, passes the argument n/ to the SortCommandParser.
Step 3. SortCommandParser#parse() is called. Detecting the n/ argument, it constructs a SortCommand with a PersonNameComparator and sort type "NAME" as arguments. (The equivalents for sorting by age a/, postal p/, and date d/ are the PersonAgeComparator, PersonPostalComparator and PersonDateComparator ).
Step 4. SortCommand#execute() will sort a copy of the filtered list toSort. Model#sort(toSort) will then update the new sorted list in the Model.
The following sequence diagram shows how the sort operation works:
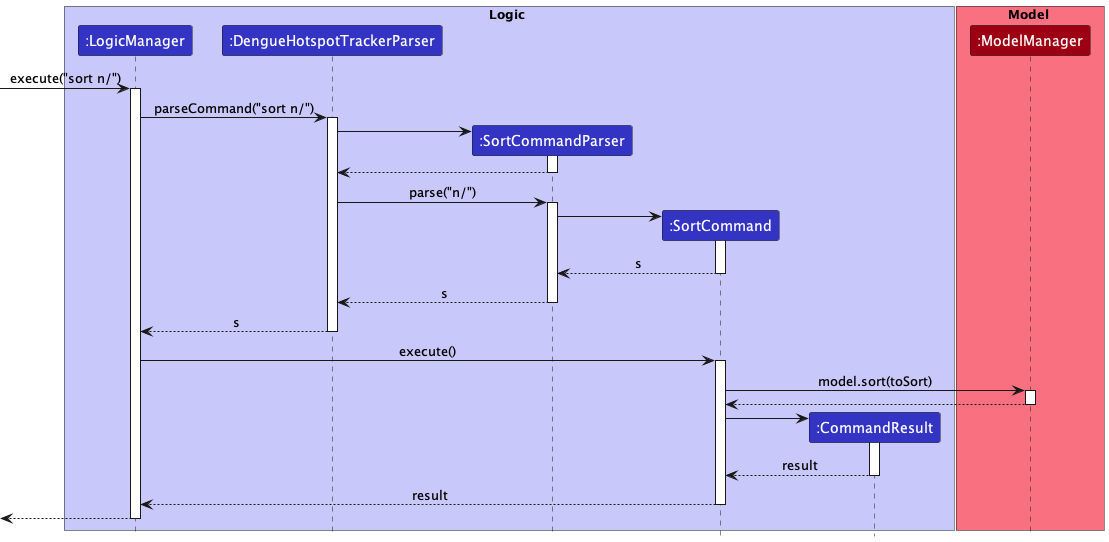
![]() Note: Sorting is performed directly on the entire list. Sorting is also permanent, i.e. it cannot be undone.
Note: Sorting is performed directly on the entire list. Sorting is also permanent, i.e. it cannot be undone.
Undo/redo feature
Implementation
The undo/redo mechanism is facilitated by TemporaryMemory. It extends SpecialisedStackForMemory, which implements StackWithStorage.
TemporaryMemory only stores the 10 most recent actions performed by the user, when the app is open. This means that when the app is closed and open again, the user will not be able to perform an undo or redo.
TemporaryMemory can be viewed as a stack which supports additional operations.
-
TemporaryMemoryonly contains 10 saved iterations of the file. Therefore, older iterations are deleted. -
TemporaryMemorysupports the redo command, and therefore, after performing an undo, more recent iterations of the file are still stored in an auxiliary storage component. - When the user performs an undo and then edits/saves the file once again, more recent iterations of the file must be overwritten. Therefore, this temporary storage is cleared.
TemporaryMemory, therefore, is a specialised memory stack, where each item is an iteration of the Dengue Hotspot Tracker file. It holds as attributes a Deque for the primary memory stack and an auxiliary storage Stack, which temporarily stores popped items (undone operations).
-
TemporaryMemory#saveNewLatest(ReadOnlyDengueHotspotTracker latest)— Saves the current Dengue Hotspot Tracker state in its history, pushing it into the primary memory stack represented by aDeque. -
TemporaryMemory#undo()— Restores the previous Dengue Hotspot Tracker state from its history. This pops an item from the primary memory stack represented by aDequeand pushes it into the auxiliary storage stack implemented with aStack. -
TemporaryMemory#redo()— Restores a previously undone Dengue Hotspot Tracker state from its history. This pushes an item from the auxiliaryStackback into the primary memory stack. -
TemporaryMemory#loadCurrent()— Peeks into the top element of the stack and loads it. These operations are exposed in theModelinterface asModel#saveChanges(),Model#undo(),Model#redo()andModel#updateFromMemoryStack(). Given below is an example usage scenario and how the undo/redo mechanism behaves at each step.
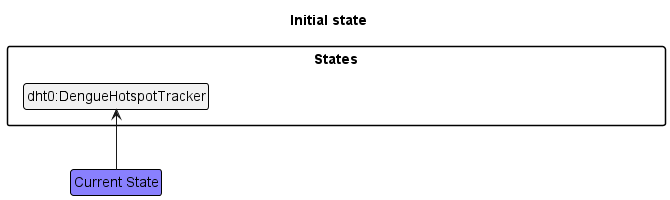
Step 1. The user launches the application for the first time. The DengueHotspotTracker will be initialized with the initial Dengue Hotspot Tracker state, and the TemporaryMemory stack implementation contains only the current Dengue Hotspot Tracker state.
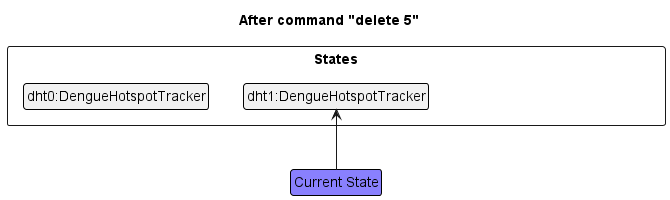
Step 2. The user executes delete 5 command to delete the fifth case in the Dengue Hotspot Tracker. The delete command calls Model#saveChanges(). The Dengue Hotspot Tracker is modified, and a copy of the modified Dengue Hotspot Tracker is generated by DengueHotspotTracker#generateDeepCopy(). This deep copy is pushed into the TemporaryMemory stack under its Deque.
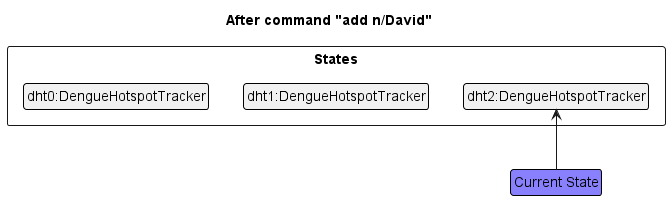
Step 3. The user executes add n/David d/2000 31 January... to add a new case. The add command also calls Model#saveChanges(), causing another modified Dengue Hotspot Tracker state to be deep-copied and saved into the TemporaryMemory stack, under its Deque.
![]() Note: If a command fails its execution, it will not call
Note: If a command fails its execution, it will not call Model#saveChanges(), so the Dengue Hotspot Tracker state will not be saved into the TemporaryMemory.
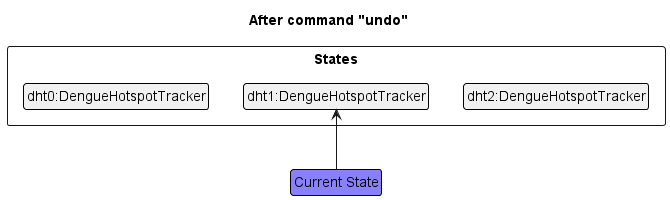
Step 4. The user now decides that adding the case was a mistake, and decides to undo that action by executing the undo command. The undo command pops an item from the primary Deque in TemporaryMemory, and pushes it into the auxiliary storage Stack. The new top-level item in the primary Deque stack will be read in as the current file.
![]() Note: If there is only 1 element in the
Note: If there is only 1 element in the Deque, then there are no previous DengueHotspotTracker states to restore. The undo command uses TemporaryMemory#canUndo to check if this is the case. If so, it will return an error to the user rather
than attempting to perform the undo.
Step 5. The user again decides that adding the case was not a mistake, and decides to redo the action by executing the redo command. The redo command pops an item from the auxiliary Stack in TemporaryMemory and pushes it back into the primary stack Deque, where it is being read as the current file.
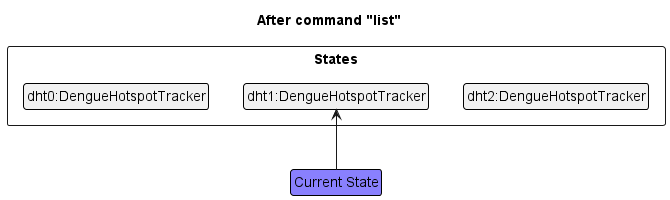
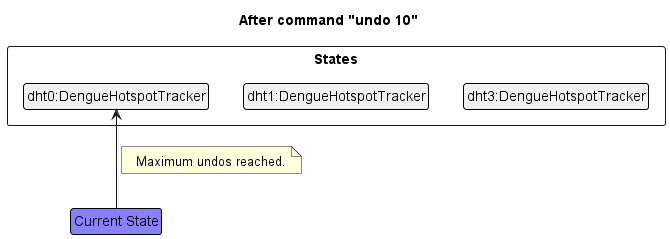
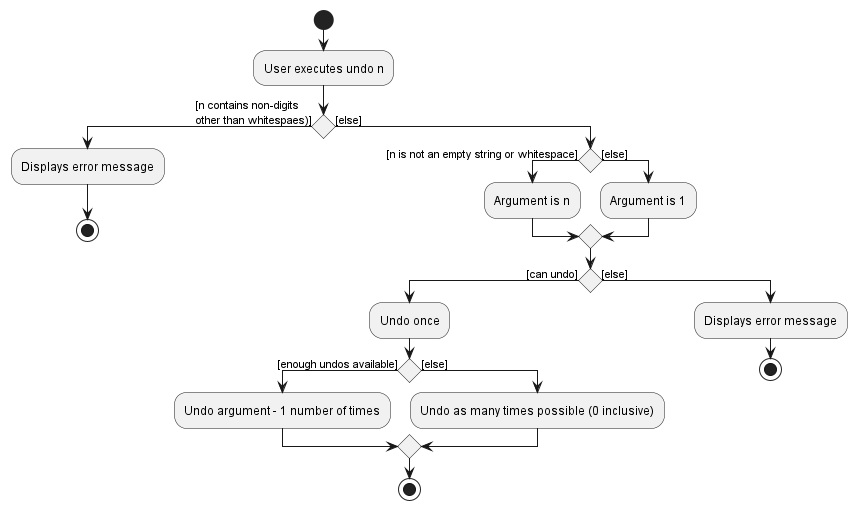
Step 6. The user now wishes to perform an undo ten times. The user executes the undo 10 command to undo ten steps. However, only two iterations of the tracker data are popped from the TemporaryMemory primary Deque and pushed into the auxiliary Stack. Because only three DengueHotspotTracker states exist, only two undos are possible.
Step 7. The user decides to perform a redo, resulting in a change of state again.
Step 8. The user then decides to execute the command list. Commands that do not modify the Dengue Hotspot Tracker, such as list, will usually not call Model#saveChanges(). Thus Model#undo() or Model#redo() will ignore this command. Thus, the TemporaryMemory remains unchanged.
The following activity and sequence diagrams shows how the undo operation works:

The redo command does the opposite — it calls TemporaryMemory#redo(), which pops from the auxiliary Stack once, and pushes the popped item back into the primary Deque, restoring the Dengue Hotspot Tracker to a previous state.
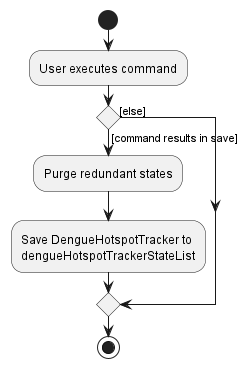
The following activity diagram summarises what happens when a user executes a new command that alters the data (add, delete, edit):
Design considerations
Aspect: How undo/redo executes
-
Alternative 1 (current choice): Saves 10 previous iterations of the entire dengue case list temporarily while the app is running.
- Pros: Saves memory as all tracker iterations are deleted when the app closes. Deleting older tracker iterations also helps to improve performance.
- Cons: User may not have access to older data.
-
Alternative 2: Saves 10 previous iterations of the entire dengue case list in a JSON file.
- Pros: User can have direct access to older data.
- Cons: Can be very messy to implement.
Aspect: Support switching of DengueHotspotTracker states in undo/redo
-
Alternative 1 (current choice): Modified stack consisting of Deque and Stack.
- Pros:
StackandArrayDequeare classes that are already implemented in Java. Easy to create. - Cons: Not easy to come up with solution.
- Pros:
-
Alternative 2: List of
DengueHotspotTrackerstates, with pointers to support switching of states.- Pros: Very intuitive and easy to think of.
- Cons: Not easy to implement, and keeping tracker of list indices may cause bugs.
Overview feature
Implementation
The overview feature’s functionality can be split into two portions:
- Changing the overview type
- Automatically updating the overview
The former is an active command call, and is facilitated by the DengueHotspotTrackerParser#parseCommand(), OverviewCommandParser#parse(), OverviewCommand#execute(), and Model#setOverview() methods.
The latter is passive behaviour, and is largely facilitated by the Model#getOverview() and OverviewDisplay#updateOverviewDisplay()methods, called after every successful command.
Both of these Model methods are implemented in ModelManager. These access implementations of the Overview and Analyst interfaces and the DataBin class, where most of the functionality resides.
Unlike other commands, the GUI display of the overview is maintained by the OverviewDisplay class, which represents the overview panel (on the right hand side of the window) and holds many DataBinCard instances, similar to how PersonListPanel carries PersonCard instances.
Given below is an example usage scenario for the active functionality and how the overview mechanism behaves at each step.
It would be helpful to note that DengueHotspotTrackerParser#parseCommand() is called from LogicManager#execute(), which is in turn called from MainWindow#executeCommand() when the user inputs a command via the CLI. Many other mechanisms occur in these methods, but for the sake of brevity, we will only focus on the paths and parts of interest.
Step 1. The user executes the overview a/ command to change the overview to split the data based on age group.
Step 2. DengueHotspotTrackerParser#parseCommand() detects the overview command word and passes the argument a/ to the OverviewCommandParser.
Step 3. OverviewCommandParser#parse() is called. Detecting the a/ argument as the prefix for Age, it constructs an OverviewCommand with a new empty AgeOverview and overview type "AGE" as arguments.
Step 4. OverviewCommand#execute() calls ModelManager#setOverview() and changes the Overview stored in ModelManager to the empty AgeOverview instance.
The following sequence diagram shows how the active overview operation works:

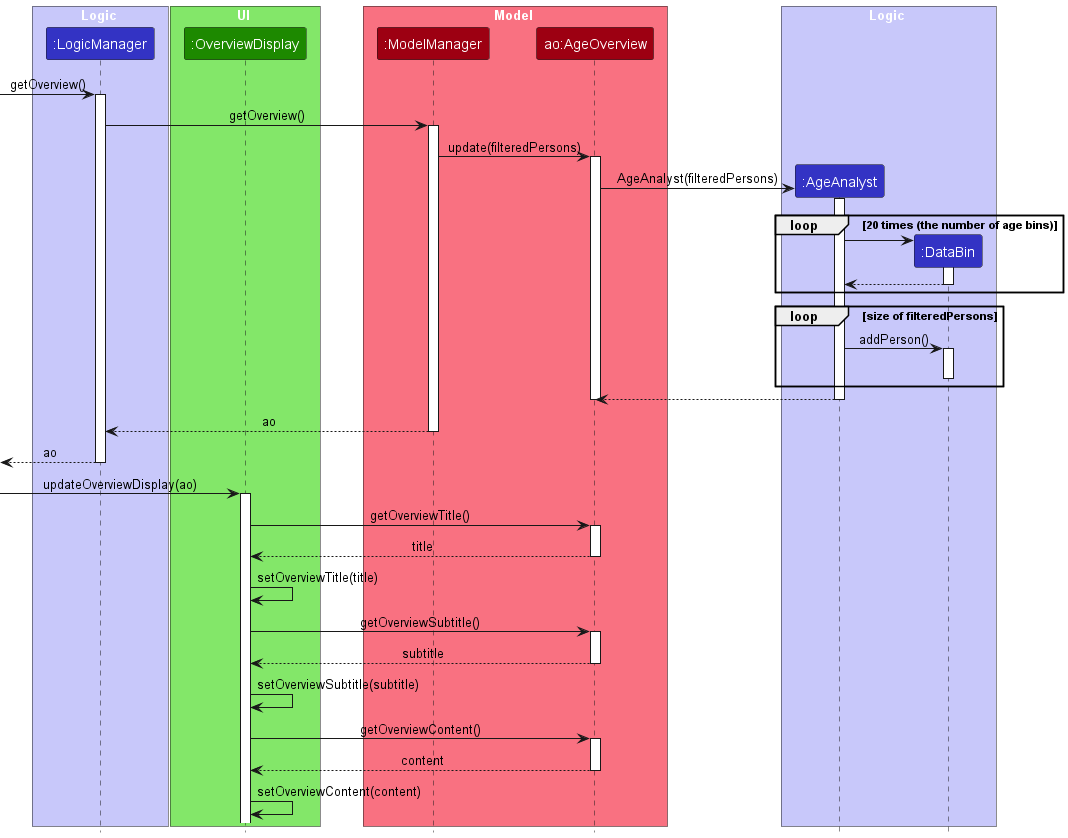
We continue with this example to show the passive functionality.
Step 5. Next, LogicManager#getOverview() calls ModelManager#getOverview().
Step 6. AgeOverview#update() updates the new empty AgeOverview (or whichever Overview instance is present) with the current filtered list of Person instances in ModelManager.
Step 7. AgeOverview creates a new AgeAnalyst instance with this list. This begins the construction of a list of new empty DataBin instances, and the list of Person instances is iterated through to fill up the matching DataBin via DataBin#addPerson().
Step 8. This AgeOverview is then passed back to MainWindow, and OverviewDisplay#updateOverviewDisplay() updates the GUI’s display with the appropriate title, subtitle, and contents from the AgeOverview.
Once again, the following sequence diagram shows how the passive overview operation works:
Design considerations
Aspect: How to store the overview bins
-
Alternative 1: As an
ObservableListinModel.- Pros: Streamlines updating the GUI since it complements JavaFX’s
ListView. Theoretically much faster. - Cons: Updating bins is not as trivial as updating a list of
Personobjects, especially when many changes happen at once, due to the layers of computation; this will either require further (otherwise unnecessary) abstraction and multiple layers ofObservablestructures, or ‘refreshing’ all the entries in theObservableListafter every command, which negates any speed/elegance benefit. Also requires more housekeeping when the overview type changes, since the object reference will likely be changed as well.
- Pros: Streamlines updating the GUI since it complements JavaFX’s
-
Alternative 2 (current choice): As an object that contains a normal
List.- Pros: Far simpler and safer to implement. Easier to update entries and titles as they can be stored in the same non-final
Overviewinstance. - Cons: Inefficient and not very elegant - the entire list must be rebuilt after every command, all the way down to the
DataBinlayer.
- Pros: Far simpler and safer to implement. Easier to update entries and titles as they can be stored in the same non-final
Import feature
Implementation
The import mechanism is primarily facilitated by the DengueHotspotTrackerParser#parseCommand(),
ImportCommandParser#parse(), ImportCommand#execute() and
CsvDengueHotspotStorage#readDengueHotspotStorage() methods.
Given below is an example usage scenario and how the import csv mechanism behaves at each step.
Step 1. The user launches the application.
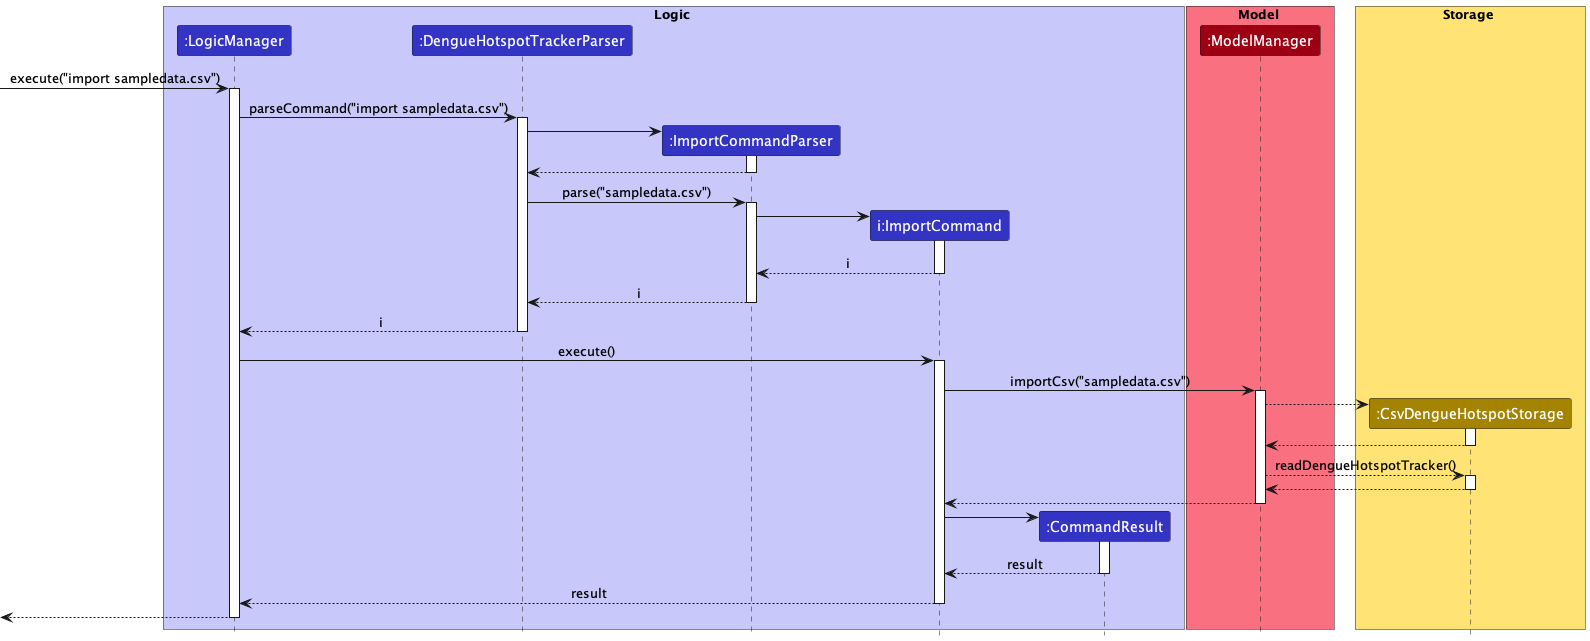
Step 2. The user executes the import sampledata.csv command to import a list of cases from sampledata.csv.
DengueHotspotTrackerParser#parseCommand() parses the command and, detecting the import command word,
passes the argument sampledata.csv to the importCommandParser.
Step 3. ImportCommandParser#parse() is called. It checks that sampledata.csv does not contain any special characters,
and that it ends with .csv. An ImportCommand is constructed, taking in the trimmed filepath sampledata.csv as an argument.
Step 4. ImportCommand#execute() will get the trimmed filepath and retrieve the list of cases to import from sampledata.csv.
Step 5. A CsvDengueHotspotStorage is created and CsvDengueHotspotStorage#readDengueHotspotStorage() is called,
importing the valid case list if the format is valid.
The following sequence diagram shows how the import command works:
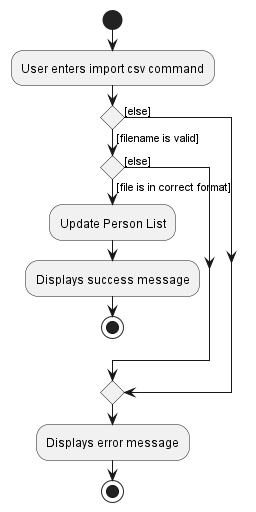
The following activity diagram summarises what happens when a user executes an import command:
Design Considerations
Aspect: What filenames and directories accepted
-
Alternative 1 (current choice): Accept only filenames without special characters and are contained within the
same directory. This is done by checking the inputted filename ends with .csv and does not contain non-alphanumeric
characters.
- Pros: This makes storage of the files easy and it is easy to validate the filename.
- Cons: Less flexibility in where the user can import their files from. It is limited to the same
directory.
- We also do not currently accept additional directory specifications and files must be imported from the same
directory as
dht.jar.
- We also do not currently accept additional directory specifications and files must be imported from the same
directory as
-
Alternative 2: Allows a wider range of filename inputs including subdirectories.
- Pros: More flexibility as to where the user can import their files from.
- Cons: Harder to implement. Refer to Planned Enhancements.
Export feature
Implementation
The feature is largely similar to the import up to step 4.
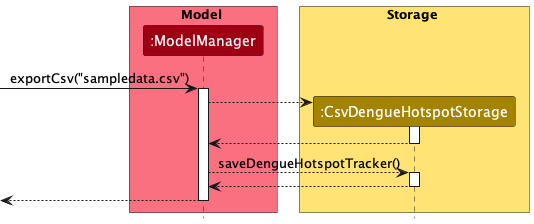
Step 5. A CsvDengueHotspotStorage is created and CsvDengueHotspotStorage#saveDengueHotspotStorage() is called,
saving the csv to sampledata.csv.
The following sequence diagram represents the difference in step 5:
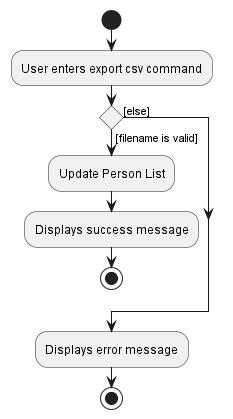
The following activity diagram summarises what happens when a user executes an export command:
Design considerations
Aspect: What filenames and directories accepted
Same as import command design considerations for what filenames are accepted.
Aspect: Overwrite checking
-
Alternative 1 (current choice): We currently allow the user to overwrite CSV files stored as long as the IO operations are successful.
- Pros: It is easier to implement.
- Cons: This is an issue as a user can accidentally override important CSV files.
-
Alternative 2:
- Pros: Adds an additional layer of check so that the user does not override previously stored CSV files.
- Cons: Harder to implement. Refer to Planned Enhancement.
Checkout feature
This feature is largely similar to the export up to step 4.
Step 5: Model calls Overview#getOverviewContent() to obtain the list to export to CSV.
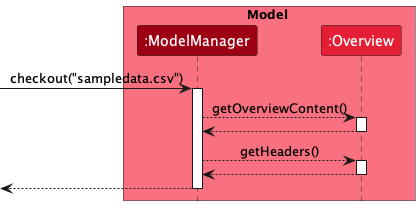
The activity diagram is similar to that of the export command.
Design considerations
The design considerations and Planned Enhancements are the same as that of export.
Documentation, logging, testing, configuration, dev-ops
Appendix: Requirements
Product scope
Target user profile:
- NEA personnel in charge of delegating personnel to dengue hotspots in order to mitigate the spread of dengue via pest control
- has some mastery over using a computer
- prefers typing to other means of input
Value proposition: Inefficient allocation of pest control resources will cost excess time and money. This app will help optimise resources by tracking dengue cases, classifying them by neighbourhood, and identifying clusters.
User stories
Priorities: High (must have) - * * *, Medium (nice to have) - * *, Low (unlikely to have) - *
| Priority | As a … | I want to … | So that I can… |
|---|---|---|---|
* * * |
new user | easily view a help page | know how to use the app |
* * * |
new user | list all dengue cases | have a high-level overview of the cases |
* * * |
user | add a new dengue case | keep track of the dengue cases in Singapore |
* * * |
user | delete cases from the dengue case list by index | remove cases that I no longer need |
* * * |
user | delete multiple cases from the dengue case list by index at once | remove multiple cases that I no longer need at once |
* * * |
user | delete multiple cases from the dengue case list by date at once | remove multiple cases that I no longer need at once |
* * * |
user | delete multiple cases from the dengue case list by date range at once | remove multiple cases that I no longer need at once |
* * * |
user | find dengue cases by name | locate details of cases without having to go through the entire list |
* * * |
user | find dengue cases by age | locate details of cases without having to go through the entire list |
* * * |
user | find dengue cases by age range | locate details of cases without having to go through the entire list |
* * * |
user | find dengue cases by the starting digits of their postal code | locate details of cases without having to go through the entire list |
* * * |
user | find dengue cases by date | locate details of cases without having to go through the entire list |
* * * |
user | find dengue cases by date range | locate details of cases without having to go through the entire list |
* * * |
user | find dengue cases by variant | locate details of cases without having to go through the entire list |
* * * |
user | automatically save the list of cases upon exit | reload them again the next time I open the app |
* * |
careless user | undo an action | undo my mistakes |
* * |
careless user | redo an action | redo an action that I mistakenly thought was a mistake |
* * |
user | edit a dengue case | correct mistakes in case details |
* * |
user | sort dengue cases by name | get an ordered view of the cases |
* * |
user | sort dengue cases by age | get an ordered view of the cases |
* * |
user | sort dengue cases by postal code | get an ordered view of the cases |
* * |
user | sort dengue cases by date | get an ordered view of the cases |
* * |
user | get an overview of the cases by postal code | have an overview of the geographical location of the cases |
* * |
user | get an overview of the cases by age | have an overview of the age distribution of the cases |
* * |
user | get an overview of the cases by variant | have an overview of the variant distribution of the cases |
* * |
user | export the data from the dengue case list from a database in a CSV file | analyse the data outside of the app or share it with non-users of the app |
* * |
new user | clear all entries | start over with an empty data set |
Use cases
For all use cases below, the System is the DengueHotspotTracker and the Actor is the user, unless specified otherwise.
Use case: Add a case
MSS
- User requests to add a case.
-
DengueHotspotTracker adds the case.
Use case ends.
Extensions
- 1a. The case to be added is missing a required field, or has invalid input for a field.
-
1a1. DengueHotspotTracker shows an error message. Use case resumes at step 1.
-
1a. The proposed case to be added results in a duplicate case.
- 1a1. DengueHotspotTracker shows an error message.
Use case resumes at step 1.
-
Use case: Edit a case
MSS
- User requests to list cases.
- DengueHotspotTracker shows a list of cases.
- User requests to edit a case at a particular index in the list.
-
DengueHotspotTracker edits the case.
Use case ends.
Extensions
-
2a. The list is empty.
Use case ends.
- 3a. The given index is invalid.
- 3a1. DengueHotspotTracker shows an error message.
Use case resumes at step 2.
- 3a. The user does not provide a field to edit.
- 3a1. DengueHotspotTracker shows an error message.
Use case resumes at step 2.
- 3a. The proposed edit results in a duplicate case.
- 3a1. DengueHotspotTracker shows an error message.
Use case resumes at step 2.
Use case: Delete a single case by index
MSS
- User requests to list cases.
- DengueHotspotTracker shows a list of cases.
- User requests to delete a single case by index in the list.
-
DengueHotspotTracker deletes the case.
Use case ends.
Extensions
-
2a. The list is empty.
Use case ends.
-
3a. The given index is invalid.
- 3a1. DengueHotspotTracker shows an error message.
Use case resumes at step 2.
Use case: Delete multiple cases by index
MSS
- User requests to list cases.
- DengueHotspotTracker shows a list of cases.
- User requests to delete multiple cases by index in the list.
-
DengueHotspotTracker deletes cases.
Use case ends.
Extensions
-
2a. The list is empty.
Use case ends.
-
3a. Any of the given indexes are invalid.
- 3a1. DengueHotspotTracker shows an error message.
Use case resumes at step 2.
Use case: Delete multiple cases by date
MSS
- User requests to list cases.
- DengueHotspotTracker shows a list of cases.
- User requests to delete multiple cases by date in the list.
-
DengueHotspotTracker deletes cases.
Use case ends.
Extensions
-
2a. The list is empty.
Use case ends.
-
3a. The given date is invalid.
- 3a1. DengueHotspotTracker shows an error message.
Use case resumes at step 2.
Use case: Delete multiple cases by date range
MSS
- User requests to list cases.
- DengueHotspotTracker shows a list of cases.
- User requests to delete multiple cases by date range in the list.
-
DengueHotspotTracker deletes cases.
Use case ends.
Extensions
-
2a. The list is empty. Use case ends.
-
3a. The given date range is invalid.
- 3a1. DengueHotspotTracker shows an error message.
Use case resumes at step 2.
Use case: Find cases by name
MSS
- User requests to list cases.
- DengueHotspotTracker shows a list of cases.
- User requests to find cases by name in the list.
-
DengueHotspotTracker finds cases.
Use case ends.
Extensions
-
2a. The list is empty.
Use case ends.
-
3a. The given name is invalid.
- 3a1. DengueHotspotTracker shows an error message.
Use case resumes at step 2.
Use case: Find cases by age range
MSS
- User requests to list cases.
- DengueHotspotTracker shows a list of cases.
- User requests to find cases by age range in the list.
-
DengueHotspotTracker finds cases.
Use case ends.
Extensions
-
2a. The list is empty. Use case ends.
-
3a. The given age range is invalid.
- 3a1. DengueHotspotTracker shows an error message.
Use case resumes at step 2.
Use case: Find cases by name, age and date range
MSS
- User requests to list cases.
- DengueHotspotTracker shows a list of cases.
- User requests to find cases by name, age and date range in the list.
-
DengueHotspotTracker finds cases.
Use case ends.
Extensions
-
2a. The list is empty.
Use case ends.
-
3a. The given name, age or date range is invalid.
- 3a1. DengueHotspotTracker shows an error message.
Use case resumes at step 2.
Use case: Sort the case list
MSS
- User requests to list cases.
- DengueHotspotTracker shows a list of cases.
- User requests to sort the list by a given criterion.
-
DengueHotspotTracker sorts the list by the given criterion.
Use case ends.
Extensions
-
2a. The list is empty.
Use case ends.
-
3a. The given criterion is invalid.
- 3a1. DengueHotspotTracker shows an error message.
Use case resumes at step 2.
Use case: Undo an action
MSS
- User requests to undo one action.
- DengueHotspotTracker is restored to a state before step 1.
- A list of persons is reflecting the previous state is displayed.
Extensions
-
1a. No previous states are detected, and an undo is not possible.
- 1a1. DengueHotspotTracker shows an error message.
Use case resumes at step 1.
-
2a. The DengueHotspotTracker is displaying a filtered list instead of the full list of cases.
- 2a1. DengueHotspotTracker reverts to showing the complete list.
Use case resumes at step 3.
Use case: Change the overview type
MSS
- User requests to list cases.
- DengueHotspotTracker shows a list of cases.
- User requests to change the overview type to a given aspect.
-
DengueHotspotTracker changes the overview panel to update based on the new aspect.
Use case ends.
Extensions
-
3a. The given criterion is invalid.
- 3a1. DengueHotspotTracker shows an error message.
Use case resumes at step 2.
Use case: Import data
MSS
- User requests to import list of cases from filepath.
-
DengueHotspotTracker updates case list with new list of cases.
Use case ends.
Extensions
- 1a. The filepath is invalid.
- 1a1. DengueHotspotTracker shows an error message. Use case resumes at step 1.
- 1a. The filepath contains an empty file or a file in an incorrect format.
- 1a1. DengueHotspotTracker shows an error message. Use case resumes at step 1.
Use case: Export/checkout data
MSS
- User requests to list cases.
- DengueHotspotTracker shows a list of cases.
-
User requests to export list of cases or checkout overview.
Use case ends.
Extensions
- 1a. The filepath is invalid.
- 1a1. DengueHotspotTracker shows an error message. Use case resumes at step 2.
- 1a. The file at given filepath is used by another application.
- 1a1. DengueHotspotTracker shows an error message. Use case resumes at step 2.
Non-Functional Requirements
- Should work on any mainstream OS as long as it has Java
11or above installed. - Should be able to hold up to 1000 dengue cases without a noticeable sluggishness in performance for typical usage.
- A user with above average typing speed for regular English text (i.e. not code, not system admin commands) should be able to accomplish most of the tasks faster using commands than using the mouse.
Glossary
- Mainstream OS: Windows, Linux, Unix, OS-X.
-
Case: A person who has contracted Dengue fever.
- Can be used interchangeably with Person.
- CSV file: Comma-separated values file.
Appendix: Instructions for manual testing
Given below are instructions to test the app manually.
![]() Note: These instructions only provide a starting point for testers to work on
testers are expected to do more exploratory testing.
Note: These instructions only provide a starting point for testers to work on
testers are expected to do more exploratory testing.
Launch and shutdown
-
Initial launch.
-
Download the jar file and copy into an empty folder.
-
Double-click the jar file Expected: Shows the GUI with a set of sample contacts. The window size may not be optimum.
-
-
Saving window preferences.
-
Resize the window to an optimum size. Move the window to a different location. Close the window.
-
Re-launch the app by double-clicking the jar file.
Expected: The most recent window size and location is retained.
-
Adding cases
- Adding a case.
-
Test case:
add n/Betty Tan p/123456 a/12 d/2023-03-23
Expected: A case with the nameBetty Tan, postal code123456, date2023-03-23and age12is added into DengueHotspotTracker. -
Test case:
add n/River Lee
Expected: No case is added. Error details shown in the status message.
-
Deleting cases
- Deleting a single case while all cases are being shown.
-
Prerequisites: List all cases using the
listcommand. Multiple cases in the list. -
Test case:
delete 1
Expected: First case is deleted from the list. Details of the deleted contact shown in the status message. -
Test case:
delete 0
Expected: No case is deleted. Error details shown in the status message. -
Other incorrect single-index delete commands to try:
delete,delete x,...(where x is larger than the list size)
Expected: Similar to previous.
-
-
Deleting multiple cases while all cases are being shown.
-
Prerequisites: List all cases using the
listcommand. Multiple cases in the list. -
Test case:
delete 1 2.
Expected: First and second cases are deleted from the list. Number of cases deleted shown in the status message. -
Test case:
delete 0 1.
Expected: No case is deleted as at least one of the given indexes is out of range. Error details shown in the status message.
-
Sorting cases
-
Sorting cases.
-
Prerequisites: List all cases using the
listcommand. Multiple cases in the list. -
Test case:
sort n/.
Expected: Cases are sorted by name. -
Test case:
sort v/.
Expected: List does not change. Error details shown in the status message.
-
Exporting/Importing data
-
Testing import CSV.
-
Remove
denguehotspottracker.csvfile in the /data folder. -
Run
DengueHotSpotTrackerto obtain an initialized list of cases. -
Enter Command:
export sampledata.csvto export existing list of cases.
Expected: Successfully exported data to sampledata.csv -
Enter Command:
clearto clear existing list of cases. -
Enter Command:
import sampledata.csvto import sampledata.csv.
Expected: Successfully imported data from sampledata.csv
-
Saving data
-
Dealing with missing/corrupted data files.
-
Ensure that
DengueHotspotTrackeris currently not running. -
Open
data/denguehotspottracker.csvfile with your favourite text editor. -
Remove any of the quotation marks.
-
Run
DengueHotspotTracker. Since the data file is not in the correct format,DengueHotspotTrackershould start without any data.
-
Appendix: Effort
Our group found the project somewhat challenging despite being familiar with one another’s working styles beforehand and putting in significant effort into planning. Besides good ol’ merge conflicts, we also faced disagreements over what features to add and how to implement each of them. For instance, some of us had differing opinions on the value that certain features would bring to users, as well as the level of abstraction to achieve when implementing new features. Another challenge we faced was over- or underestimating the amount of effort required to implement certain features, leading to a slight imbalance in workload. Although we believe we have put in an average level of effort compared to other groups, one of our previous lectures did suggest that most groups tended to stretch themselves too much, going far beyond what was required.
Nevertheless, we found working on this software engineering project a gratifying and fulfilling experience. It was all our first times working on and collaborating with others on a large-scale code base. Those of us who were more experienced with GitHub, good code quality, etc. were able to share their expertise and still gain new insights from the less experienced members of the team. Each of us improved our software engineering skills: we learnt how to build good, maintainable software, and gained experience in both manual and automated testing.
Some more specific achievements include producing a product that was more complex than AB3 due to our enhanced input validation. For instance, postal codes have to begin with a valid two-digit postal sector, both age and date ranges have to be valid, and multiple date formats are accepted. We also greatly enhanced the UI of the product, enhancing the visual experience for users.
Appendix: Planned Enhancements
Standardising terminology
DengueHotspotTracker currently alternates between using “case” or “person” to refer to each entry in the app. Standardising terminology would clean up the app and reduce any potential confusion for users and developers.
Enhancing duplicate checking
DengueHotspotTracker currently considers a case a duplicate if they have the same name, age, and postal code as another pre-existing case. However, this would cause adding a case to fail if the same person were to contract dengue fever again at a later date—an unlikely but not impossible scenario.
In future, we would improve duplicate checking to include checking for date and variant as well.
Sorting by descending order
The sort command currently only allows users to sort in ascending order. Users might find it more useful in some cases to sort by descending order instead, e.g. if they wish to examine the most recent cases, or find the cases with the highest ages. We plan to add the ability to sort by descending order to make the app more useful for our users.
Wrapping longer names for better readability
Currently, longer names will be truncated; to see the full name, the user needs to manually resize the app window. To reduce inconvenience on users, we plan to add text wrapping so that longer names can still be fully read without the user having to manually adjust the window size.
Standardising success messages
Although both the find and delete commands can filter the case list by date and date range, their success messages differ:
the find command merely states the number of cases found, while the delete command further clarifies the date or date range
within which the cases were found:
While minor, the discrepancy may cause confusion to users. We plan to standardise the success message, mentioning in both cases the date or date range within which the cases were found for greater clarity.
Do an existence check on the files before export
We will implement a checker that will prompt the user asking if they’re sure they want to override the CSV file currently at the filename location.
We did not implement this due to the difficulty as well as not having thought about it prior to v1.4.
Check the validity of filenames which include subdirectories
This feature is helpful as described under export command’s design considerations. However, this is an additional feature
and we were not able to add it into v1.4.
This is a very helpful feature since it prevents accidental mistakes of overwriting preexisting CSV files.